
Twenty-five minutes. One pan. Half the cake was gone before I even got to the frosting stage. That’s the magic of Twinkie Cake — it’s as quick to make as it is to eat.
This one’s perfect for nights when you need a sweet treat but don’t want to spend hours baking. With a light, fluffy base and a whipped cream filling, it beats store-bought versions any day (trust me on this). Plus, you get to skip the whole “filling the cake with cream” hassle since it’s layered right in. Just mix, bake, and enjoy! So good.
Why You’ll Love This Twinkie Cake
- Super Easy: It comes together in no time, and you don’t need any fancy skills to whip it up.
- Sweet and Creamy: The combination of flavors is like a nostalgic trip back to childhood — pure happiness in every bite.
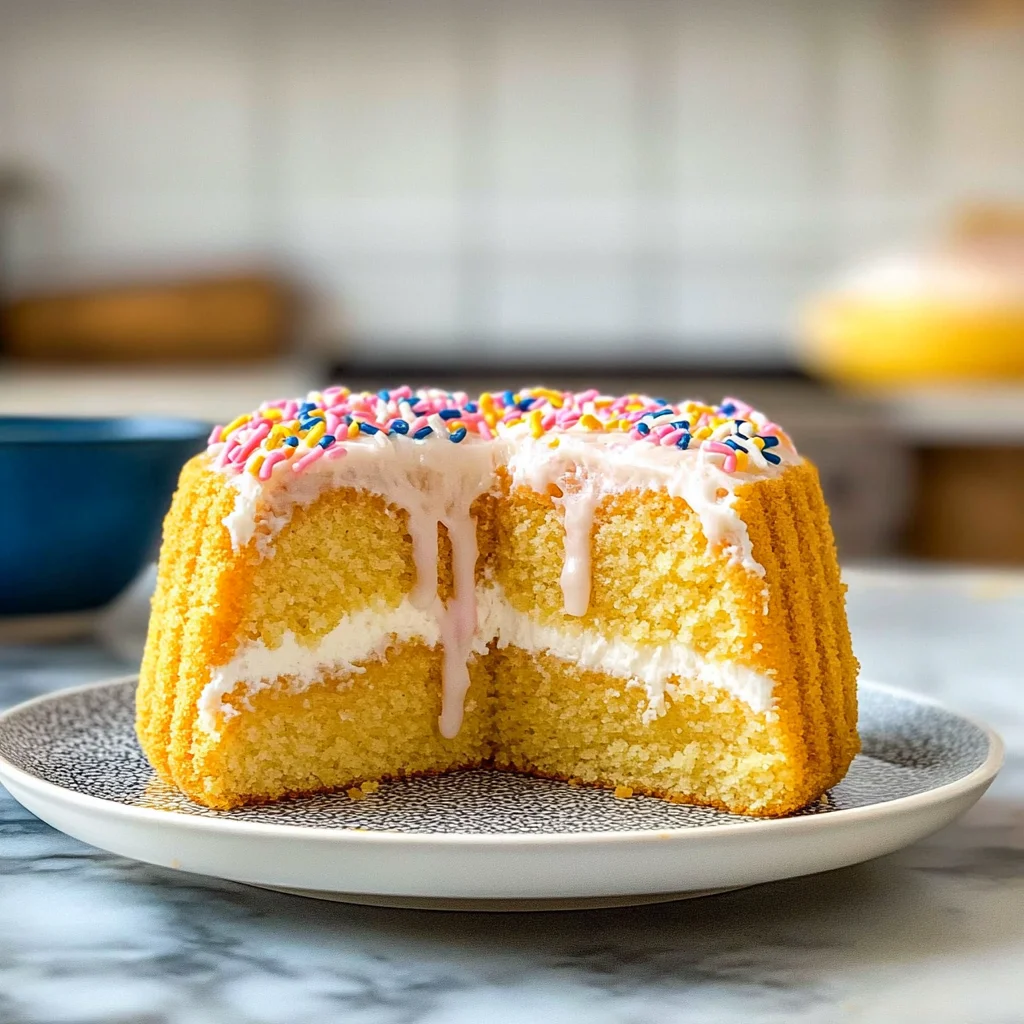
- Soft and Fluffy: The texture is melt-in-your-mouth good, and that filling? Total creamy perfection (you’ll want seconds).
- Customizable Toppings: Dress it up with fruit, sprinkles, or even chocolate chips. Get creative; it’s super versatile!
- Watch for Soggy Layers: If you’re not careful with the filling, it might get a bit soggy over time. Eat it fresh!
Twinkie Cake Ingredients
For the Base:
all-purpose flour (2 cups) — Use a kitchen scale for flour; too much makes the cake dense and dry.
granulated sugar (1 cup) — Go for Domino sugar; other brands just don’t dissolve as well in the batter.
baking powder (1 tablespoon) — Don’t skimp on the baking powder; use fresh or your cake won’t rise properly.
salt (1 teaspoon) — Skip the salt, and the cake’ll taste flat; it enhances all the flavors.
whole milk (1 cup) — Use whole milk, not skim; it gives the cake richness and moisture.
unsalted butter (1/2 cup) — Always use unsalted butter; salted will throw off the cake’s sweetness balance.
eggs (3 large) — Room temp eggs mix in better; cold ones can lead to a lumpy batter.
vanilla extract (1 teaspoon) — Real vanilla extract’s a must; imitation’s just a cheap knockoff that ruins flavor.
For the Filling:
heavy cream (1 cup) — Use heavy cream for the frosting; milk won’t whip up properly for that fluffy texture.
powdered sugar (1/4 cup) — Powdered sugar’s gotta be sifted; otherwise, you’ll end up with a gritty frosting.
vanilla extract (1 teaspoon) — Don’t use almond milk instead of milk; the flavor’s too strong and messes with the cake.
For the Frosting:
unsalted butter (1/2 cup)
powdered sugar (3 cups)
milk (2 tablespoons)
vanilla extract (1 teaspoon)
Full measurements in the recipe card below.
How to Make Twinkie Cake
1. Preheat and Prep: Preheat your oven to 350°F (175°C) and grease a 9×13 inch baking pan. You want it ready for that golden-edged cake!
2. Mix Dry Ingredients: In a large bowl, mix together the all-purpose flour, granulated sugar, baking powder, and salt until well combined. It should look like a fluffy cloud (trust me on this).
3. Combine Wet Ingredients: In another bowl, whisk together the whole milk, unsalted butter, eggs, and vanilla extract until smooth. You’re aiming for a creamy texture without lumps here.
4. Combine Mixtures: Pour the wet ingredients into the dry ones and mix until just combined — don’t overdo it! The batter should be slightly lumpy; that’s totally normal.
5. Bake the Base: Pour the batter into your prepared pan and smooth the top with a spatula. Bake for 25 minutes or until a toothpick inserted in the center comes out clean (you’ll know it’s done when it bounces back slightly when touched).
6. Whip the Filling: While the cake cools, beat your chilled heavy cream until soft peaks form. Then add in powdered sugar and vanilla extract, beating until stiff peaks form — you want it fluffy, not runny.
7. Assemble & Frost: Once cooled, slice the cake horizontally to create two layers. Spread the whipped filling evenly over the bottom layer, place on top layer, then frost all around with your prepared frosting.
Watch out for rushing things during assembly; if you try to frost while it’s still warm, it’ll melt right off!
Exact quantities in the recipe card below.
How to Store Twinkie Cake
- Room Temperature: Keep it in an airtight container for up to 2 days. (But honestly, it won’t last that long if you’ve got people around.)
- Refrigerator: Store in a covered dish for about 4-5 days. The filling might get a little less fluffy, but it still tastes good!
- Freezer: Wrap slices tightly in plastic wrap and then foil. It’ll last about 2 months, but the texture can change a bit when thawed (just a heads up!).
- Reheating: If you want to warm it up, pop a slice in the microwave for about 10-15 seconds. You’ll know it’s ready when the filling starts to soften and ooze just a bit.
What to Serve with Twinkie Cake?
This cake is sweet enough to be a dessert on its own, but adding some contrasting flavors keeps it from feeling too indulgent. Here are a few suggestions to round out your meal:
- Fresh Berries: Try strawberries or raspberries for a tart bite that balances the cake’s sweetness perfectly.
- Whipped Cream: A dollop of lightly sweetened cream adds a light, airy texture that complements the dense cake.
- Lemon Sorbet: This frozen treat gives a refreshing acidity that cuts through the richness and cleanses your palate.
- Mint Tea: Brew a pot while the cake cools; the warm herbal notes bring out the vanilla without being overpowering.
- Chocolate Sauce: Drizzle it on top for extra decadence; just keep it warm so it contrasts with the cold filling.
- Coffee or Espresso: The bitterness of coffee contrasts beautifully with all that sugar (and it’s ready in minutes!).
- Sliced Bananas: Add some fresh banana slices on the side for a soft texture and mild flavor that complements it well.
Twinkie Cake Variations
Here’s how to play with this recipe:
- Lemon Zest Twist: Add 2 tablespoons of lemon zest to the wet ingredients for a bright, citrusy flavor.
- Chocolate Drizzle Upgrade: Melt 1/2 cup of chocolate chips and drizzle over the frosted cake for a decadent finish.
- Almond Extract Surprise: Swap the vanilla extract for almond extract in the filling for a nutty twist.
- Berry Filling Addition: Fold in 1 cup of fresh berries into the whipped cream filling for a fruity burst.
- Coconut Cream Variation: Mix in 1/4 cup shredded coconut with the whipped cream filling for tropical vibes.
- Caramel Swirl Delight: Drizzle caramel sauce between the layers before frosting for extra sweetness (trust me, it’s worth it!).
- Nutty Crunch Option: Sprinkle chopped nuts on top of the frosting for added texture and flavor.
Make Ahead Options for Twinkie Cake
I like to prep the base of my Twinkie Cake a day in advance. Just bake it, let it cool completely, then wrap it tightly in plastic wrap and store it in an airtight container at room temperature. The filling can also be whipped up ahead of time; just keep that chilled in the fridge until you’re ready to use it. I usually wait to frost the cake until right before serving so it stays nice and fresh (the frosting holds well for a couple of days, but I find the layers can get soggy if they sit too long). Trust me, you don’t want mushy layers! Finish strong with that frosting when you’re ready to dig in. Enjoy every bite!
Twinkie Cake Recipe FAQs
Can I make Twinkie Cake ahead of time?
Absolutely! You can bake the cake a day in advance. Just let it cool completely, wrap it tightly in plastic wrap, and store it at room temperature. When you’re ready to assemble, whip up the filling and frosting, then layer everything together. Just remember to refrigerate after frosting — it’ll keep it fresh and tasty. (Trust me, it’s way better chilled!)
Why did my Twinkie Cake turn out dense?
If your cake’s dense, you might’ve used too much flour or not enough baking powder. Make sure you’re using a kitchen scale for accuracy; too much flour is a common mistake! Also, check that your baking powder’s fresh — if it’s expired, your cake won’t rise properly. A light and fluffy texture is what you want here!
What can I substitute for heavy cream in this dish?
You really shouldn’t skip the heavy cream for the filling; it’s key for that fluffy texture! If you’re out of heavy cream, I recommend using full-fat coconut milk as a backup. Just know it’ll have a slightly different flavor profile. And don’t even think about using regular milk; it won’t whip up right!
How do I know when my Twinkie Cake is done baking?
Your cake should bounce back when lightly touched in the center — that’s your cue! Also, if a toothpick comes out clean after inserting it into the middle, you’re golden (or rather, golden-edged). Don’t be tempted to open the oven door too soon; let those layers rise undisturbed for a nice structure!
Final Thoughts on Twinkie Cake
This Twinkie Cake is totally worth making for the fluffy, creamy filling that takes it to another level. I mean, who doesn’t love a cake that’s like a dessert and an experience all in one? If you’ve been putting this off, tonight’s the night. Don’t overthink it; just follow the steps and enjoy the process. Trust me, you’ll want to share it with friends (or keep it all to yourself — no judgment here). Let me know how yours turned out in the comments!
Twinkie Cake
Ingredients
Method
- Preheat your oven to 350°F (175°C) and grease a 9x13 inch baking pan.
- In a large bowl, mix together the flour, sugar, baking powder, and salt.
- In another bowl, whisk together the milk, melted butter, eggs, and vanilla extract until well combined.
- Pour the wet ingredients into the dry ingredients and mix until just combined.
- Pour the batter into the prepared baking pan and smooth the top with a spatula.
- Bake for 25 minutes or until a toothpick inserted in the center comes out clean.
- In a mixing bowl, beat the chilled heavy cream until soft peaks form.
- Add the powdered sugar and vanilla extract, and continue beating until stiff peaks form.
- In a separate bowl, beat the softened butter until creamy.
- Gradually add the powdered sugar, alternating with milk, until you reach a smooth consistency.
- Stir in the vanilla extract.
- Once the cake is completely cooled, slice it horizontally to create two layers.
- Spread the filling evenly over the bottom layer of the cake.
- Place the top layer of the cake back on, then frost the top and sides with the prepared frosting.
- Decorate as desired and refrigerate for at least 30 minutes before serving.